Building upon the foundation of the draggable overlay button detailed in the first part of this series, we now move forward to constructing the actual developer tool. This next phase involves diving into the intricacies of the SpyDashboardModel core and designing core model objects like tags, categories, integrations, and entries.
SpyDashboard demo
Generic Models
/// Tag for the spy message
public protocol SpyTag: Equatable, CaseIterable, Identifiable {
    var name: String? { get }
    var displayable: any View { get }
}

/// Category of the spy message
public protocol SpyCategory: Equatable, CaseIterable {
    var name: String { get }
    var displayable: any View { get }
}

public protocol SpyIntegration {
    /// Provides prefixes that we should allow ignoring for a given `SpyEntry`
    func ignorablePrefixes<Tag: SpyTag, Category: SpyCategory>(for entry: SpyEntry<Tag, Category>) -> [String]
}


/// Entry log containing all neccesary information for the console
public struct SpyEntry<Tag: SpyTag, Category: SpyCategory>: Identifiable {
    public init(
        id: UUID = .init(),
        category: Category,
        tags: [Tag],
        timestamp: Date,
        message: String,
        detail: String?
    ) {
        self.id = id
        self.category = category
        self.tags = tags
        self.timestamp = timestamp
        self.message = message
        self.detail = detail
    }

    public var id: UUID = .init()

    public var tags: [Tag]
    public var category: Category
    public var timestamp: Date
    public var message: String
    public var detail: String?
}
Generic Models
- Tag (
SpyTag)
The SpyTag protocol defines a tag for the spy message. Tags can be used to label and categorize different messages for easy identification and filtering.
name: An optional String representing the name of the tag.displayable: A SwiftUI view that provides a visual representation of the tag.
2. Category (SpyCategory)
The SpyCategory protocol defines a category for the spy message. Categories allow you to group messages into different sections, providing a higher level of organization.
name: A String representing the name of the category.displayable: A SwiftUI view that provides a visual representation of the category.
3. Integration (SpyIntegration)
The SpyIntegration protocol offers a method for determining which prefixes should be ignored in a given SpyEntry. This functionality allows for more precise control and filtering of the displayed messages.
ignorablePrefixes(for entry: SpyEntry<Tag, Category>): Returns an array of Strings representing prefixes that can be ignored for a specific entry.
4. Entry (SpyEntry)
The SpyEntry structure represents an individual log entry containing all necessary information for the console. This includes details such as tags, category, timestamp, and message content.
id: A unique identifier for the entry.tags: An array of tags associated with the entry.category: The category associated with the entry.timestamp: A date object representing the time the message was created.message: The main content of the entry.detail: An optional String containing additional information about the entry.
These models form the backbone of the spy dashboard, providing the essential building blocks for organizing, filtering, and displaying log information. By clearly defining these protocols and structure, you enable a flexible and robust system for managing and interacting with spy messages.

Categories and models visualized together
Example configuration:
enum Categories: SpyCategory {
    case info
    case error

    var displayable: any View {
        switch self {
        case .info:
            Image(systemName: "info.circle.fill")
                .foregroundStyle(.gray)
        case .error:
            Image(systemName: "exclamationmark.circle.fill")
                .foregroundStyle(.red)
        }
    }

    var name: String {
        switch self {
        case .info:
            "Info"
        case .error:
            "Error"
        }
    }
}

enum Tags: String, SpyTag {
    case none
    case tca
    case todos

    @ViewBuilder
    var displayable: any View {
        switch self {
        case .none:
            EmptyView()
        case .tca:
            Image(systemName: "storefront")
        case .todos:
            Image(systemName: "checkmark.message.fill")
        }
    }

    var name: String? {
        switch self {
        case .tca:
            "tca"
        case .todos:
            "todos"
        case .none:
            nil
        }
    }

    var id: String {
        rawValue
    }
}
Sample configuration for tags and categories
DashboardModel
The SpyDashboardModel is a centerpiece of functionality that acts as a powerful log manager with the ability to filter, sort, and display log entries. Here’s an exploration of its main features and design:
Always compiled
Dashboard states
The idea behind SpyDashboard is that it’s always in the code (not just debug), the way this works is by defining 3 states it can be in:
-
Enabled and Recording
-
Usually the default for debug builds and can be turned on by beta settings
-
Enabled and Idle
-
Available but not recording, allowing you to turn it on selectively if something feels fishy, e.g. your app slows down, enable recording and see what’s going on.
-
Disabled
-
Still in the codebase but negligible cost since no UI is presented nor log processing is happening
🤔
Normally I’d use contextMenu for the overlay modes but there is a SwiftUI bug that causes all touches to be swallowed by the overlay, even if it’s just 40x40 px, to workaround this I simply added a custom overlay manually.
Factoring the right views
To simplify the integration point we expose a factory from our model, and since our model is a ObservableObject this factory will be called whenever we need to update the UI.
@ViewBuilder
    public var contents: some View {
        ZStack {
            overlayToggle
                .frame(maxWidth: .infinity, maxHeight: .infinity)

            dashboard
        }
    }
This means that we can easily integrate the tool in root of our view hierarchy by adding overlay modifier
.overlay { dashboardModel
.contents
}Filters
Filters play a crucial role in the SpyDashboardModel by allowing users to quickly find specific entries, categories, or tags. They work by applying certain conditions or criteria to the displayed data.
- Creating Filters: A filter is created by selecting a combination of categories, tags, and even using textual search within entries.
- Applying Filters: Once a filter is created, it can be applied to the current view, narrowing down the displayed information to only what matches the filter criteria.
We implement them as simple value type:
public struct Filter: Identifiable {
        public enum Mode {
            case contains(String)
            case prefix(String)
            case tag(Tag)
            case category(Category)
        }

        public var id: UUID = .init()
        public var mode: Mode

        func excludes(_ entry: Entry) -> Bool {
            switch mode {
            case let .contains(value):
                return entry.message.contains(value)
            case let .prefix(prefix):
                return entry.message.hasPrefix(prefix)
            case let .tag(tag):
                return entry.tags.contains(tag)
            case let .category(category):
                return entry.category == category
            }
        }
    }
Filter definition
We’ll also display those filters later on in detail view by simply adding an extension in View Layer:
extension SpyDashboardModel.Filter {
    @ViewBuilder
    var label: some View {
        switch mode {
        case let .contains(value):
            Text("Message contains \"\(Text(value.trimmingCharacters(in: .whitespacesAndNewlines)).bold())\"")
        case let .prefix(value):
            Text("Message starts with \"\(Text(value.trimmingCharacters(in: .whitespacesAndNewlines)).bold())\"")
        case let .tag(value):
            HStack {
                Text("Tag is \(Text(value.name ?? "").bold())")
                AnyView(value.displayable)
            }
        case let .category(value):
            Text("Category is \(Text(value.name).bold())")
        }
    }
}
Filters visual extension
Resulting in:
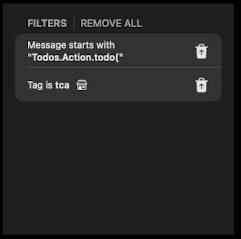
Active filters
Category filtering
It’s very convenient to filter by categories, for that we can leverage simple Menu code to list all categories and allow user to select which ones they want to see, but we also want this to fit into existing filtering setup:
Menu("Categories") { ForEach(Array(Category.allCases), id: \.name) { category in
Toggle(isOn: model.binding(for: category), label: {
Text(category.name)
})
}
}But for that to work we need to create a binding helper:
func binding(for category: Category) -> Binding<Bool> {
    .init(get: {
        !self.filters.contains(where: { filter in
            if case let .category(test) = filter.mode {
                return test == category
            }
            return false
        })
    }, set: { enabled in
        if !enabled {
            self.filters.append(.init(mode: .category(category)))
        } else {
            self.filters.removeAll(where: { filter in
                if case let .category(test) = filter.mode {
                    return test == category
                }
                return false
            })
        }
    })
}
Binding code
get
The get closure is used to determine the current state of the binding (i.e., whether the category is filtered or not). It checks whether the filters array contains a filter with the given category.
If it does contain a filter with the category, the method returns false, meaning the category is filtered out.
set
The set closure is used to modify the underlying data based on user interaction with the UI:
If enabled is set to false, a new filter is added to the filters array with the given category. This means that the category will be filtered out.
Conclusion
We’ve took some time exploring the SpyDashboardModel! From crafting tags and categories to creating filters that let us zoom in on just what we need, we’ve built a developer tool that’s all about understanding what’s going on in our app.
And guess what? We’ve only just begun! Next week, we’re rolling up our sleeves to polish the UI, connect it through TCA, and then it’s off to GitHub for everyone to use.